Showing posts with label fix. Show all posts
Showing posts with label fix. Show all posts
Tuesday, February 14, 2017
Fix Memory Card Can Not Recognized
Fix Memory Card Can Not Recognized

Memory Card is one of the instruments of digital data storage, can be in the form of video, music, and other Archive files. The form and size varied according to memory slot that contained in devices that require the storage media. Usage of memory card is now being a very important instruments, especially in the field of computer, multimedia, mobile phones, digital camera and other devices that require storage equipment inside, where you can bring it easily to your purposes. Because of its small and slim, memory card is designed with the large functionality and flexible for many various types of digital media in the circulation than the flash drive that much more oriented to the computer data storage.
Memory Card has a chip connector that have a function as a connector to the many kind of media so that the content or data can be read by the media that you connected the data therein. Sometimes happens when we are not concerned with memory card or storage data inside and the memory card in the bad place, the connector chip clothed with dirt settles or corrosion. When this happens the chip connector is unable to connect as perfectly with the memory card reader connector. So what happens is with the memory card that can not be read or not recognized by the media that has a memory card slot or card reader.
Actually this is a simple problem that may occur on the memory card that you have. If the memory card can not recognized by a card reader or a memory card slot located on the media that you have, such as laptops, mobile phones, digital camera or the other. Do not throw away the memory card first or buy a new one. I would suggest you that you check your memory card connector chip before deciding to buy a new one.
Look at the picture above ! the connector chip consists with some pin or port that everything should connected perfectly. If there is any one which is not connected with your media slot, the memory card is not recognized or damage. To fix the problem, you should be clean the memory card connector chip from all kinds of dirt and corrosion veil that blocks connections that happen is by using wet tissue or tissue with alcohol were given, rubbed on all memory card connector chip. If the chip connector cleaner in sight let stand a few minutes until dry. Then wipe with a dry tissue. In this way the memory card will be read back if the problem because of connector chip.
Available link for download
Monday, February 13, 2017
Fix Problem Database connection error 3 on Joomla
Fix Problem Database connection error 3 on Joomla

On this time i would like to tell you about the problem that usually occur when the first time try to upload your website files, with using database content from the localhost of your computer to the hosting place through cpanel. Surely The problem to be an issue that is very amusing. But before you found the point of this problem it is a scourge that is very annoying and probably make you furious. The problem Shown by "Database connection error (3): Could not connect to database"
After exploring and going anywhere, there is any various forums that was said like this. This error message means that you connect to the database server is wrong. For the installation like Joomla site, When this happens, "localhost" should use a database server. You make the problem because you are setting up your database with the host "localhosttt" (localhost spelled wrong).
Are you satisfied with the answer, they told you to make sure the spelling by correctly localhostt to be localhost. Have you ever made the mistake with typing like this. For me, I have never typed manually like that, which make the error occured. And I guess my configuration.php file nothing wrong. So the idea is totally incompetent with my problem and not give the solution. How about you?
I have tried to find my solution for the problem a long time too. I just can only see my site shown by "Database connection error (3): Could not connect to database". What can i do ? who can understand my problem and give me another solution. That is just i wanted to share my experience with you, and I think the problem is not far from the problem with database. Then I go to Mysql Database on my site through Cpanel.

Look at the picture above, this is where things can be the culprit of our problems. This problem can occur because we forget about the database Privileges. We must never forget it because you can be find the problem like this "Database connection error (3): Could not connect to database" will continue to haunt your site. On User Database Click Add and check All Privileges should be activated and then click make changes like the picture bellow.

After that you can go to your browser and type your site address, and I guess your site will appear as normally. Ok its already clearly, and i hope can be towards your anger for the problems "Database connection error (3): Could not connect to database".
Available link for download
Sunday, February 12, 2017
Fix and Stabilize DNS Server Mikrotik Internet Connection
Fix and Stabilize DNS Server Mikrotik Internet Connection

This is about the analysis of the problem dns server on mikrotik network system in distributing internet connection from ISP to the server and the clients network using mikrotik router. This problem may often found during we have made the internet network using dhcp and hotspot server of the network system that no need to set the workgrouph and the IP for the clients unit . Perhaps some of you think that is easy problem to fix but for the beginner especially, This could be the biggest problem make they have stuck for long time to find the solution.
Actually the problem that indicates by “your dns server that might be unavailable” or other warning that blame dns server in problem, this is because the clients that using the internet can’t access or get dns server which can be caused by many things on the network system. This problem also can be caused by abnormality or the conflict on the client network system itself. You must think about where the source of the problem is. By comparing, analyzing and feeling, you should be able to guess where the main problem come, and minimize the problem scope.
Here I assume there is no problem with the lan cables, connector, router, access point and another equipment that you have used on your network and the individual or relative client problem. But the problem is just caused by the router, access point and wan server configuration that you may have made which is the sole responsibility of us. Ok let’s see the network scheme that I have made for the example study case!

Based on the network scheme, when we have found the problem such “your dns server might be unavailable” which one do you blame? from experience that I have found, the internet connection with Dns from ISP has reached to the wan server and router. But when the router continue to distribute the internet to the access point and finally to the clients are losing the DNS.
It looks like the router has failed to give the dns access that sometime bring the conflict on dns between wan server and the router. And this problem occurs is not consistent. The instability dns that frequently occurs is not entirely due to the fault router. It also depends on the kind internet connection from your ISP. My ISP does not allow me to use another dns, such a google and opendns. If you are using the kind ISP, building local dns server will be the best choice to overcome this problem.
It looks like the router has failed to give the dns access that sometime bring the conflict on dns between wan server and the router. And this problem occurs is not consistent. The instability dns that frequently occurs is not entirely due to the fault router. It also depends on the kind internet connection from your ISP. My ISP does not allow me to use another dns, such a google and opendns. If you are using the kind ISP, building local dns server will be the best choice to overcome this problem.

1. Using DHCP Client to Get Dynamic Network Address from WAN Server
In this case I have to change of the mikrotik router configurations especially to public interface setting. I have use dhcp client to get dynamic network address of dial-up connection ISP that is shared from wan server 192.168.137.1. It will create dynamic address list, change the Pref. Source, and create a new gateway reachable wan. Don’t forget to remove the static network adress list of the public interface and the gateway route that we have used previously! look at the pictures below!/ip dhcp-client add interface=wan use-peer-dns=yes add-default-route=yes disabled=no


2. Create Local DNS Server on Wan Server
If you have used wan server to share the internet connection from ISP (dial-up connection) you can create local dns server here. Local dns server will be collecting and covering dns from ISP and other dns. So if the client is directed to local dns server, this will be more faster . In some case local dns server can be fix problem and stabilize dns server from mikrotik router to the client. You can build local dns server using Simple Dns plus and Bind.
3. Ensuring DNS Server Setting on The Router
Check dns settings on the router that now using dynamic servers of the wan server. This is going to be the main suspect the cause of the problem dns server that might be unavailable. If you are not using dynamic servers, try to reset dns setting by removing this configuration at first, restart the router and try to set a new dns setting that use opendns server!/ip dns set allow-remote-requests=yes cache-max-ttl=1w cache-size=5000KiB max-udp-packet-size=512 servers=208.67.222.222,208.67.220.220

4. Fix the Internal Network System of Wan Server & Clients from The Conflict
Wan server should not be installed by many software that may bring any conflict which can cause the internal conflicts of the network systems. If you are not sure the network system of wan server work normally. Try to reset the network system using Complete Internet Repair to fix the internal conflict network system, select the option that you want to reset! Then you setup a new configuration on wan server and build local dns server, to create dns request works more stable and faster to your network clients.
5. Bypass The Access Point using IP Bindings on The Router Hotspot Server
This is an additional on Hotspot network system, if you are using Access Point and Hotspot Server separately. IP address or Mac address of the Access Point should be bypassed on Hotspot Server configuration. We can use IP Binding to bypass Access Point, for more clearly lets see The Access Point configuration on the pictures below!

In this case Access Point is using static IP address and the dhcp server is disabled because the Access Point is the client on the hotspot server system. So the Access Point should be made as static address on the router. Click IP > ARP then on the ARP List window, right click on the IP address or Mac address Access Point and Make it Static. Next click on new terminal and choose one of the following IP Binding rules to make the configuration on the router hotspot server to bypass the Access Point IP address or Mac address that we use, look at the pictures below!
/ip hotspot ip-binding add mac-address=F4:EC:38:D6:2E:F5 type=bypassed comment "bypass access point mac address" /ip hotspot ip-binding add address=192.168.1.254 type=bypassed comment "bypass access point ip address"


So this is all that I have done to fix and stabilize dns server system on mikrotik network, and now the hotspot clients can be access the internet that more stable. take care!
Available link for download
Saturday, February 11, 2017
Fix Problem Loading ga js In Page Google Analytics
Fix Problem Loading ga js In Page Google Analytics

Google Analytics can be used to analyze visitor traffic, from which the visitor came, keywords used, and also we can see the effectiveness of advertising on our site, which is all that we can get it for free from Google Analytics. The Problems is how to place the script code that provided by Google Analytics so that can be working perfectly to obtain complete statistics of our site.
After we insert verification of Google Analytics script code to the template of our site apparently detected but does not work perfectly. Such as ga.js tracking code from analytics, the code can be loaded when analytics are taking the formation of my blog in display the In-Page Analytics. The result is a warning "Your site does not load ga.js from Google ..." this is happening on my blog and maybe with in you, and what would you like to do now ? the problem means the script of tracking code google analytics unable to access when the process of loading In-Page Analytics.
This is the script analytics code placement where you must put, i just place that script analytics tracking code on the head of the template html of my blog. The script that i was placed I got from the google analytics of mine when i just have already registration and this is recommend to place on my blog or site and for the verification of ownership of the url at once. But when i had tried for running In-Page Analytics of the Analytics blog of mine. There was any problem and maybe also you have found today. Ga.js tracking script on the template of you site/blog can not be loaded (not working). And Whats Wrong is it...?
How many forums that I have been found, that can not help me to give the solution for my problem "does not load ga.js from google". Until I found the script code below in google analytics help
<script type="text/javascript"> var _gaq = _gaq || []; _gaq.push([_setAccount, UA-XXXXXXXX-1]); _gaq.push([_setDomainName, agratitudesign.blogspot.com]); _gaq.push([_setAllowLinker, true]); _gaq.push([_trackPageview]); (function() { var ga = document.createElement(script); ga.type = text/javascript; ga.async = true; ga.src = (https: == document.location.protocol ? https://ssl : http://www) + .google-analytics.com/ga.js; var s = document.getElementsByTagName(script)[0]; s.parentNode.insertBefore(ga, s); })(); </script> - UA-XXXXXXXX-1 is ID of your google analytics
- agratitudesign.blogspot.com is The url adress of your blog/website.
The result is the tracking code can be loaded into the web/blog page. And finally I can see the analysis of In-Page Analytics of my blog page. Hopefully this can fix the problem in the In-Page Analytics on your site/blog too. For more details lets see the above article video! Good luck !
Available link for download
Friday, February 10, 2017
Fix Bug Language Pack JLIB HTML Joomla Website
Fix Bug Language Pack JLIB HTML Joomla Website

On this time I will discuss about the appearance of any bug that occur on the page navigation joomla "JLIB_HTML_PAGE_CURRENT_OF_TOTAL, JLIB_HTML_START, and JLIB_HTML_END". Did you have found the problem that shown like the picture above? There was problem in joomla to display the pager, not so crucial but it looks like very unprofessional impression of your website if still like this. If youve attention about this problem, let us discuss together. The problem like this any something wrong to render any code so that bug is showing the html code on your joomla website and appear HTML Code on the page navigation. At first I don’t know why this is happen, suddenly after I have installed some extension on my joomla website, uncomfortable html code that shown as the picture above. This is a bad appearance on your joomla website.
What do you think about this kind bug? The bug was appeared because the language pack on your joomla system have crash because of some kind of script extension that you maybe you have used. I suggest you, if you don’t really to know and understand about any extensions, dont installed them to your joomla backend, or maybe you must try that extensions at first to the localhost of your computer as your experiment! Because this is make possible to bring any crash to your joomla system, that someday you will regret to used some extension especially for free extension joomla. It would be make you rebuild again your joomla system that must be spend a lot of your time.
In this case the problem is because I use 2 languages for language switcher, such as UK and Indonesia language. The page navigation in English is fine, but the page navigation in Indonesian language have accures this kind of bug. The bug that shown by occurring any html code on the page navigation "JLIB_HTML_PAGE_CURRENT_OF_TOTAL, JLIB_HTML_START, and JLIB_HTML_END". do you an idea how to fix this kind of problem?.
At fisrt time I have matched about two file on my joomla, that is id-ID.lib_joomla.ini then i was compared with en-GB lib_joomla.ini. But still the problem was not solved yet. The conclusion is the problem was very fairly complex script in crash and complicated. I think not much someone discuss about this problem. So what I was thinking for this problem is to find the latest version of the language pack that maybe more stable. And I was installed the language pack extensions, the result is surprised me. For those of you who used Indonesia Language Pack, you must updated Language Pack extension to the version id-ID_joomla_lang_full_2.5.8v1. The version is more stable then before. For someone who use another language you must try to looking for the latest version or reinstall the language extension that was in problem to fix Bug Language Pack JLIB_HTML.
Available link for download
Sunday, February 5, 2017
Fix installing updating packages in KALI
Fix installing updating packages in KALI
Write in terminal:->
nano /etc/apt/sources.list
and then replace all text with this
# deb cdrom:[Debian GNU/Linux 7.0 _Kali_ - Official Snapshot i386 LIVE/INSTALL $
# deb cdrom:[Debian GNU/Linux 7.0 _Kali_ - Official Snapshot i386 LIVE/INSTALL $
## Security updates
deb http://http.kali.org/ /kali main contrib non-free
deb http://http.kali.org/ /wheezy main contrib non-free
deb http://http.kali.org/kali kali-dev main contrib non-free
deb http://http.kali.org/kali kali-dev main/debian-installer
deb-src http://http.kali.org/kali kali-dev main contrib non-free
deb http://http.kali.org/kali kali main contrib non-free
deb http://http.kali.org/kali kali main/debian-installer
deb-src http://http.kali.org/kali kali main contrib non-free
deb http://security.kali.org/kali-security kali/updates main contrib non-free
deb-src http://security.kali.org/kali-security kali/updates main contrib non-fr$
then ctrl+x
press y
press enter
press y
press enter
open terminal and write
sudo apt-get upgrade
press enter
then enter this
sudo apt-get update
press enter
You Are Done...Enjoy....
Available link for download
Tuesday, January 31, 2017
Fix Webmail Unable to Receive Mail from Outside
Fix Webmail Unable to Receive Mail from Outside

When you want to upload the back-up files of your website using or without database to the cpanel for any reason about your website. It could be the cause of the webmail that can be sending mail but unable receive mail from outside. Have you found the problem like this ? The problem is occur since you upload the back-up files site can be also changes the system of the cpanel that effect to your website, no exception is effect to the webmail system.
If it is happened, its to dangerous if you dont know this situation, this cold be a big problem to your business that usually using administration online that very important to you, even the most important then other interests for you. What would happens if you have webmail just can be used to send mail but unable receive the incoming emails or reply for the sake that very important. Surely this can not be underestimated, it can be a big problem for your business, because you lost the information about your business, take care about it!
I started from the experience, the chronological problems why is it occur. First, I have made any changes by insert script plugin on my joomla site until I have the crutial problem on my joomla site. What is going to be the solution for me is to restore the system and joomla website database. After I did it on my joomla website, it could be succeed to restore the system website as well, perfectly like before. Then what happened that i have found is the problem of the webmail account about send and receive mail.
I have resetted my webmail system as the result the webmail can be used again to send mail as usual and delivered. But what is happened, I have not received the mail incoming on the inbox, a long i have not received any mail. then I was tested using another gmail account to my webmail, the result is can not delivered from gmail to the webmail. whereas I was waiting for long time a mail. I have never found the answer on the webmail.
After i was looking for around and I have got any suggestion here,
1. Quota capacity was full with email on your webmail, the solution is to delete the email that was not necessary again.
2. Do not use google apps wizard on your cpanel, if you do not know about it and consequences. If you use this facility just delete them.
3. It would be a last thing is delete the mail address on the webmail account, through the cpanel of the webmail Account, delete it and re-create a new account and password.
In this case this is not relevant for my problem, what is really happened, there are no idea that competent for my problem.
Well, what have i done is to back-up my website and database by using backup wizard. After that i was delete all data files on the cpanel. And just have the webmail on the cpanel without the website and all data files. Then I inserted the facility Forwarders on the cpanel.

You can try yourself about this problem of yours, then need to create the new account with the same address that you have deleted before. After that test again by sending mail from others to the new webmail account with the same address. As the result I can received an mail from email account such a gmail. The conclusions is restoring system website can be a conflict to your webmail, if it is happened you need to adjust your webmail.
Available link for download
Sunday, January 29, 2017
Fix Responsive Blog of the Template by Artisteer
Fix Responsive Blog of the Template by Artisteer

In the process of making a blog or website template we have to consider dimensions of the pixel on the screen of the user that may used, in order to display the content of your blog or websites as well whatever the resolution of that may used by user. The screen size of the user is very diverse. The bloggers team themselves have considered it and provide of many templates that designed with excellent and flexibility of the system, and consider to the mobile screen that may used to access our blog. It is possible sometimes you want make the template as your own use to make fit with our desire. For that we have to edit even if the need to create the template from the beginning, new, and different.
If you have skills and experience are excellent in the making of your blog template complete with the responsive style for the various of screen size, I think you do not need to read this writing. However, if you wish forward, please! In this case I will take the example of a blog template which are created using Artisteer.
To create a blog template as you desired, you must understand and consider about blogger system completely, to produce a template that does not seem amateur. I think it depends on how deep of your knowledge and experience to design a template such a blogger. For those of you that want to make a professional blog template quickly, perhaps Artisteer be a pretty wise choice, dont you? Nevertheless template that originally with Artisteer still looks stiff in my opinion, require any change in some other parts of the template that we have used.
As the generator blog template, template by artisteer have created under the automatic programmed of artisteer software that depends on programmer knowledge about blogger system. Artisteer makes a template, complete with css responsive style. There are some parts of widgets the sidebar in less convenient for the responsive display, especially when you make adds and you have do any changes on the template. Personally i feel tired every time I added or changed a section on the template that must also define its position consider with overall of css responsive style to avoid no something cluttered. If you not define the responsive style every you add div tag on the template, it is possible making responsive display is cluttered. It is most severe in the display of the responsive for adsense ads. Artisteer on the latest i known makes adsense ads on my template blog in the responsive display is not appear or just a half displayed. It is something that you must repaired to keep in safe your adsense ads.
Below is the view of flexibility of the responsive template blog by Artisteer that i have change on the logo, by default is hide. Adsense ads is not looks good, some widgets on the sidebar is cluttered. have you found the same thing with me?


In order to fix the responsive display of the template by artisteer, you must add the CSS media query by adsense script below! This script code will keep the display all part of the template, especially for adsense ads on the screen to keep it performed well.
CSS Media Query by Adsense :
.adslot_1 { width: 320px; height: 50px; } @media (min-width:500px) { .adslot_1 { width: 468px; height: 60px; }} @media (min-width:800px) { .adslot_1 { width: 728px; height: 90px; }} If you have used a template that created by artisteer, as usual go to your dashboard of your blog, and click template>edit html. On the script of your template, find css media queries by Artisteer that is usually already included in the second group of the style code that consist with many responsive class inside and find the following code:
CSS Media Query Artisteer Default :
@media all and (max-width: 959px) { #art-resp, #art-resp-t { display: block; } #art-resp-m { display: none; } } @media all and (max-width: 480px) { #art-resp, #art-resp-m { display: block; } #art-resp-t { display: none; } } Replace CSS Media Query Artisteer with CSS Media Query by Adsense on your template that created by artisteer. If you do is right, the display of the template in "live on blog" on your dashboard will be shown complete with sidebar like the picture on the very top. If you make smaller on your browser window, All part of the template is not cluttered like before. For more details, let’s see the article video! Good Luck!
Available link for download
Fix Problem IP Cloud Access Router Remotely Via Internet
Fix Problem IP Cloud Access Router Remotely Via Internet

Now I want to talk about the IP Cloud as a new feature in Router OS Version 6. For those of you who want to access the router wherever you want as long as you are connected to the Internet, the IP cloud will help to get your router DNS Name easily so that you can access the router remotely via internet. For more details you can see on this video!
In order to control your mikrotik router from outside your network there are several ways, but here I will talk about the IP Cloud. To setup IP Cloud, there are a few things that you must be understand, what is needed, and how it could happen. We can access the router from outside network by using public IP address that is related to your ISP services.
You must know the kind of public IP that provided by ISP to fix the problem that you may found during the configuration of the IP Cloud. Some of this terms probably is my own term to classify public IP to make understanding of the public IP that was given by ISP when you use the internet connection.
Special Public IP : ISP have provided a specific public IP for you, you have full rights to use and manage this public IP into your network, because this public IP specifically for you and no one can use it. You like given the address or name on the internet to your network. ISP will give you a special price for this.
Common Public IP : ISP is not given special IP address or name to you on the internet, but you still use public IP to be connected to the internet. In this case you will use the public ip together with all clients of your ISP and this public ip fully managed by ISP itself. You like being under their clients network there is no special name for your network.
Static Public IP : Public IP that is used will not be changed because it is not planned to be changed, this public IP can be Special Public IP or Common Public IP as our terms.
Dynamic Public IP : Public IP that always be changed dynamically when you use connect to internet, the changes have ranges as the network mask of the public IP that used by ISP. Same like Static Public IP, it can be Special Public IP or Common Public IP.
Private IP is the addresss of your local network, you are free to give the IP address for all network units, but it can not be known that can not be accessing directly via internet without forwarding the public IP itself. In other word Private IP is a relative IP address to your network and Public IP is an Absolute IP address to your network.Common Public IP : ISP is not given special IP address or name to you on the internet, but you still use public IP to be connected to the internet. In this case you will use the public ip together with all clients of your ISP and this public ip fully managed by ISP itself. You like being under their clients network there is no special name for your network.
Static Public IP : Public IP that is used will not be changed because it is not planned to be changed, this public IP can be Special Public IP or Common Public IP as our terms.
Dynamic Public IP : Public IP that always be changed dynamically when you use connect to internet, the changes have ranges as the network mask of the public IP that used by ISP. Same like Static Public IP, it can be Special Public IP or Common Public IP.
1. Setup IP Cloud in QoS Ros for the Version 6.14 and Above
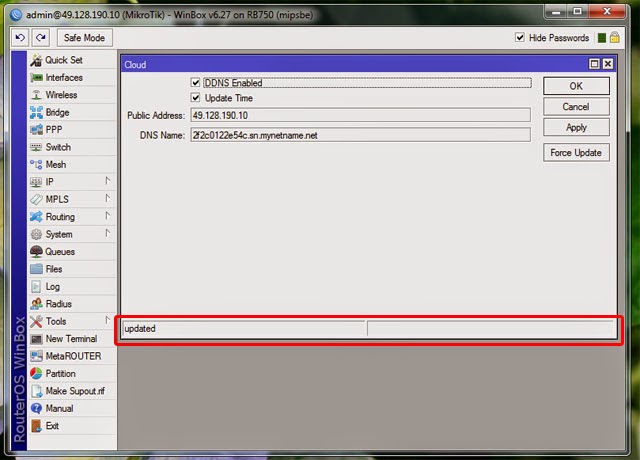
To obtain a DNS name using IP Cloud Mikrotik you can be done in a very simple way. Click IP > Cloud, at Cloud window and tick on enable and update time option and click Apply!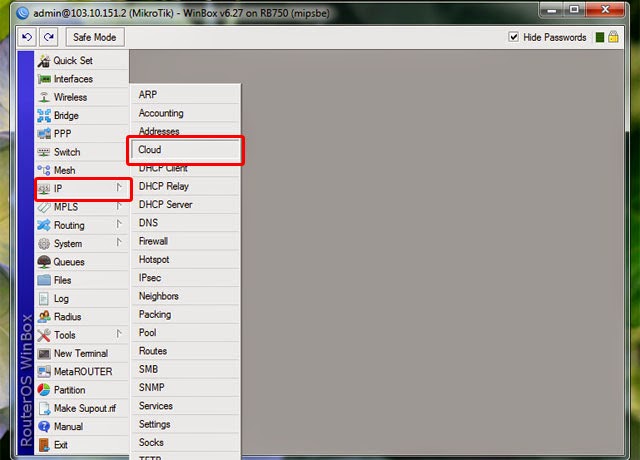
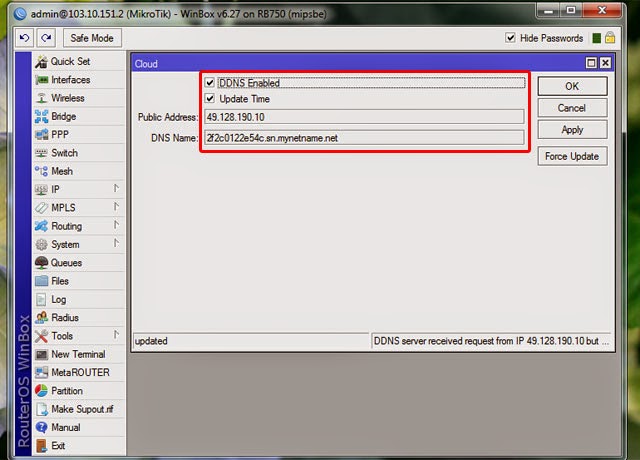
Furthermore, if you see the warning like this! "DDNS server received request from IP 49.128.190.10 but your local IP was 103.10.151.2; DDNS service might not work." It means your public interface router is just using Private IP. In this situation you can not use this DNS Name by IP Cloud to access the router from outside network or the internet. For more information about configuring IP Cloud you can click on this wiki mikrotik link here.
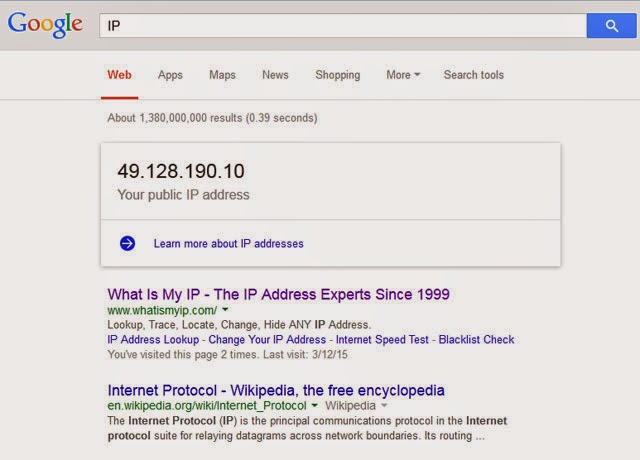
Therefore to fix this problem understanding of the public IP that provided by ISP and the IP address that you use to the router public interface becomes very important. When you want to access you router remotely via internet, it means you want to accces the router from outside of your network by using internet that will be open the port of your router public interface. You can ask your ISP or check by typing IP on Google Search, or you can use any website to detect your public Ip that currently used!
If you have Special Public IP in my own term from your ISP to your network, but the public IP that you have is in dynamic public IP that can be changed at any time by your ISP, IP cloud will be the best solution that will update your public IP automatically so you do not lose your dns name from the current public IP to access router from outside network. This is going to be the main goal of the IP Cloud as the solution for dynamic public IP.
In this case I do not have a special public ip which means I just only have private ip on my router public interface, but my ISP uses static public IP, I just need to make some adjustments of the IP network of my router public interface and the IP gateway of wan server to make the IP Cloud can be working. And it still allow me to access the router using DNS name by IP Cloud or the common public ip of my ISP. It means thats me who was claimed this public ip by ISP as the address for my router, does it not?
In this case I do not have a special public ip which means I just only have private ip on my router public interface, but my ISP uses static public IP, I just need to make some adjustments of the IP network of my router public interface and the IP gateway of wan server to make the IP Cloud can be working. And it still allow me to access the router using DNS name by IP Cloud or the common public ip of my ISP. It means thats me who was claimed this public ip by ISP as the address for my router, does it not?
2. Change The Network IP of the Public Interface (Wan) on Address List
Open winbox using the current IP address of the interface that you connected, In this case I have connected to the router from wan server. Click IP > Addresses, and click wan interface on the address List, then I need to change address and network to adjust with the public IP 49.128.190.10, you can see as shown like the picture below!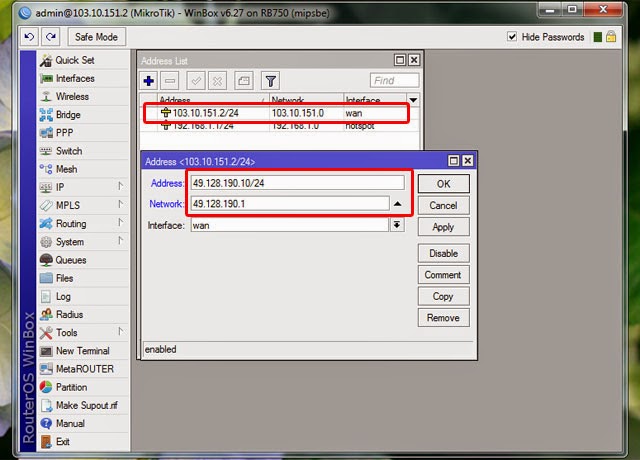
3. Change The IP address of Wan Server
Open Network Connection, Right click on the wan adapter as the internet server and choose the properties and change the IP address. In this case I have to change the IP address to be 49.128.190.1 as the internet gateway of the router, as shown like the picture below!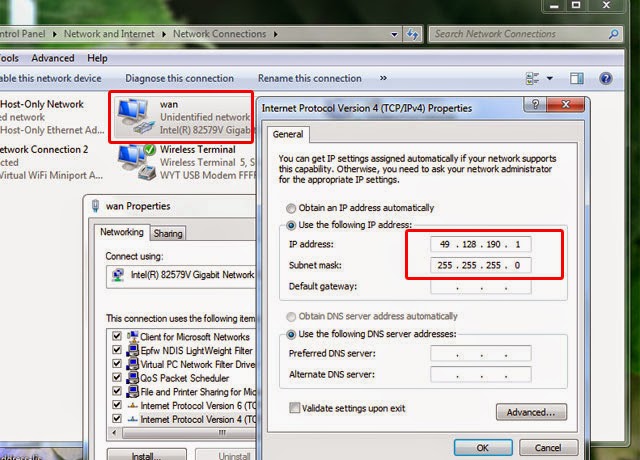
4. Change the Gateway Route according to IP address of the internet gateway of Wan server
Open winbox using the new IP address of the public interface, and click IP > Routes. On the Route List you click on unreachable gateway that need to change to be the new IP Gateway of Wan Server in this case 49.128.190.1, click ok and you have changed the IP network of the public router according to public IP by ISP as shown like the picture below!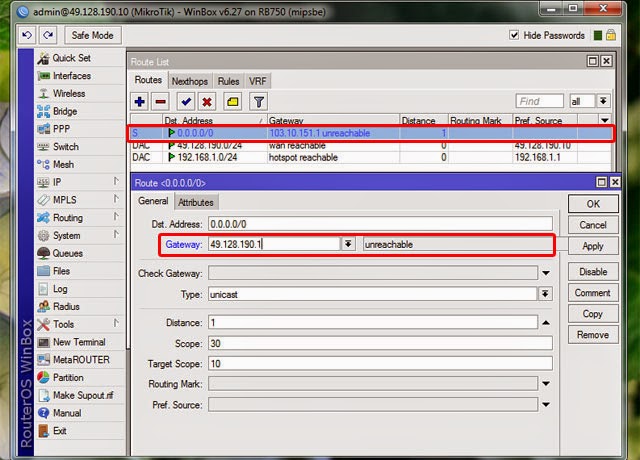
And Finally you can check your router DNS Name. Still on winbox, click IP > Cloud and now you can find the IP Cloud has been updated. With this DNS Name you can access your router from the internet remotely.
This is going to be the basic understanding to access all the equipment that using IP Address on the network such a CCTV network, same like the router you can access the video CCTV network from outside just using internet connection.
Available link for download
Fix Problem Joomla Component Unable uninstalled
Fix Problem Joomla Component Unable uninstalled

Due to an event or whatever it is youve done, you find one component joomla extensions that you had look like this. That is not working properly,event we want to uninstall but was unable, error was accur. When we wanted to install it again also error, the install process prematurely. As far as what you experience to try to find solution of this problem?
If allowed he would be trash in your administrator, and will only reduce the performance of your site, however you really need it. The first thing I did was delete all the files from the home directory cpanel related that to be the troubled component.

Im looking for files related to the name componentnya, then I delete. Then what happened does not like my expectations. Component is still there but does not function as it should. From this I derive a conclusion, for uninstall component manually, it is not enough just delete the files in the home directory folder. when we are installing extensions, it will go well into the sql database.
Well, the next step is to delete the database table in phpmyadmin,described as shown below. Surely not to delete the wrong things only the name component that you known.

After deleting the entire table componentnya, enter the following query sql script:
- DELETE FROM `sg_extensions` WHERE `name`=com_obrss;
- DELETE FROM `sg_assets` WHERE `name`=com_obrss;
- DELETE FROM `sg_menu` WHERE `type`=component AND `title` LIKE %com_obrss%;
- DELETE FROM `sg_session` WHERE `data` LIKE %com_obrss%
sg is the component database table prefix, obrss is component name, you change components and customize your database prefix and press go!

Then you check the problematic component, assuming the right components you already erased correctly, then you can reinstall it sucsesfullly.
Sometimes happens, that component menu links are not displayed in Joomla! administration, try to run these SQL queries:
- UPDATE `sg_menu` SET `published` = 1 WHERE `type` = component AND `title` LIKE %com_obrss%;
- UPDATE `sg_menu` SET `component_id` = (SELECT `extension_id` FROM `sg_extensions` WHERE `type` = component AND `name` = com_obrss) WHERE `type` = component AND `title` LIKE %com_obrss%;;
Available link for download
Thursday, January 26, 2017
Fix Problem Database Connection Error 2 on Joomla
Fix Problem Database Connection Error 2 on Joomla

This problem indicated by the warning of "Database connection error warnings (2): Could not connect to MySQL". Indeed you would think about the cause of the problem that makes appears a warning like this on your site, and how to fix the problem. Okay straight to the point of the problem. This error message usually come because "configuration.php" file in public html on cpanel does not match with database name or database username. Therefore we need to match the "configuration.php" that place in public html, with the database and username can be seen in the mysql database on the cpanel.

From here you can see and checks the name of MySql database (1) and then check the username database (2), after that you should check the username password that you give on your site database. Look at the picture for more clearly!

On the picture above, the password database MySQL sign by bla..bla..bla..bla..bla.. you can not see but if you forget, you can change it with the new password. Write down the three variables above for you do not forget it. The next, we will adjust the three variables above into the configuration.php content.

After that, you are going to your cpanel ----> File Manager -----> Public_html. Public_html is the place where all of site files put in here. There are many files of your site, one of them is Comfiguration.php. Then you are going to see configuration.php file and then select edit button on the bar menu on cpanel. But before that you must check the permission of the file, must be able to write, Approximately as shown like the picture below!

After you get the three variables that you adjust the three variables that you noted yet, do not wrong in placement of. the three variables, If you are in right rule, the error "Database connection error (2): Could not connect to MySQL "will be disappear and your site will be coming as well. For more clearly
Available link for download
Subscribe to:
Posts (Atom)